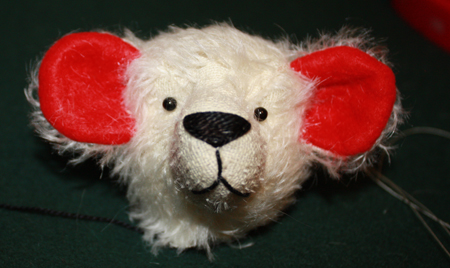
Sculpturing a bear’s head give’s it dimension and so much personality. This tutorial comes from my 100 page Making a Teddy Bear Tutorial which is available on my Etsy site. We begin after the nose is embroidered and the ears are attached to the head. For now, ignore the thread coming out of the neck.

THE EYES HAVE IT

Use 2 matching pins to mark placement of your eyes. Experiment with location by moving the pins until you are happy with the placement.For this bear, I have placed the pins on the seam of the gusset. Be sure that the pins are equidistant from the nose.

Thread the really long doll needle with heavy upholstery thread doubled and knotted at the end.Insert the needle through the neck opening, going through the Polyfil. Come out behind one of the ears.

Insert your needle close to where you are & come out at the eye opposite of the ear. Remove the pin, pull the needle through.


-Insert needle where you are; come out at the other eye. Remove the pin.
-Insert the needle where you are now, taking a small stitch next to the thread. Go right through the head and come out at the other eye. Pull the thread all the way through but not tightly.
-You are going to repeat the previous step. Insert the needle, taking a small stitch and go right through the head again. Go back and forth about 3-4 times.
-When you go back and forth through the head, you are anchoring the thread to make sure that the thread will stay put when you give it a strong pull in the next step.
-

Pull the thread tightly. You now have a bridge in the nose & 2 sunken eyes.
Insert your needle next to the closest eye indention and come out behind the opposite ear. Put those matching pins back in the indentions to mark where you will insert the eyes

The next step will be painful to you but I promise will not hurt the Teddy. He can’t see yet.Using an awl, make a tiny hole on each eye indentation.

OUCH!
Insert the needle from behind the ear and come out at the eye hole at the opposite side of the head. (We will be criss crossing from behind each ear to the opposite eyes.) Be sure that you come out at the hole and not even a thread closer.

-Put the eye loop on the needle and pull the eye through on the thread.
-Check your eye hole to make sure that it is big enough for the loop to fit through but not so big that the entire eye will pull through.

The eye is dangling on the thread.
-Insert the needle back into the same hole and return the needle and thread back to behind the ear.
-Pull the eye so that the loop of the eye is in the hole. Pull tightly to be sure that the eye is firmly in the hole. -- - -Take a stitch behind the ear to anchor the thread and keep the eye from slipping out.
-Now repeat the same process for inserting the second eye. Knot off and cut the upholstery thread when, you are done.

eyebrows 1
-Hey Connie, what about the embroidery thread hanging out of my neck?” That’s a good question. How about adding some eyebrows?
-Place 2 pins over each eye to mark placement of brows.
-You choose the brow size. Be sure that they are both the same length.

-Put a needle on the embroidery thread is still coming out of the neck.
-Insert your needle up through the head and make one stitch for the first brow. Go back into the head to the second eye. -Take a stitch for the second brow. Remove the pins. Come down to the neck. Knot and cut your thread

Done! How about a bow?


 THE EYES HAVE IT
 Use 2 matching pins to mark placement of your eyes. Experiment with location by moving the pins until you are happy with the placement.For this bear, I have placed the pins on the seam of the gusset. Be sure that the pins are equidistant from the nose.
 Thread the really long doll needle with heavy upholstery thread doubled and knotted at the end.Insert the needle through the neck opening, going through the Polyfil. Come out behind one of the ears.
 Insert your needle close to where you are & come out at the eye opposite of the ear. Remove the pin, pull the needle through.

 -Insert needle where you are; come out at the other eye. Remove the pin.
-Insert the needle where you are now, taking a small stitch next to the thread. Go right through the head and come out at the other eye. Pull the thread all the way through but not tightly.
-You are going to repeat the previous step. Insert the needle, taking a small stitch and go right through the head again. Go back and forth about 3-4 times.
-When you go back and forth through the head, you are anchoring the thread to make sure that the thread will stay put when you give it a strong pull in the next step.
-
-Insert needle where you are; come out at the other eye. Remove the pin.
-Insert the needle where you are now, taking a small stitch next to the thread. Go right through the head and come out at the other eye. Pull the thread all the way through but not tightly.
-You are going to repeat the previous step. Insert the needle, taking a small stitch and go right through the head again. Go back and forth about 3-4 times.
-When you go back and forth through the head, you are anchoring the thread to make sure that the thread will stay put when you give it a strong pull in the next step.
- Pull the thread tightly. You now have a bridge in the nose & 2 sunken eyes.
Insert your needle next to the closest eye indention and come out behind the opposite ear. Put those matching pins back in the indentions to mark where you will insert the eyes
Pull the thread tightly. You now have a bridge in the nose & 2 sunken eyes.
Insert your needle next to the closest eye indention and come out behind the opposite ear. Put those matching pins back in the indentions to mark where you will insert the eyes
 The next step will be painful to you but I promise will not hurt the Teddy. He can’t see yet.Using an awl, make a tiny hole on each eye indentation.
 OUCH!
Insert the needle from behind the ear and come out at the eye hole at the opposite side of the head. (We will be criss crossing from behind each ear to the opposite eyes.) Be sure that you come out at the hole and not even a thread closer.
OUCH!
Insert the needle from behind the ear and come out at the eye hole at the opposite side of the head. (We will be criss crossing from behind each ear to the opposite eyes.) Be sure that you come out at the hole and not even a thread closer.
 -Put the eye loop on the needle and pull the eye through on the thread.
-Check your eye hole to make sure that it is big enough for the loop to fit through but not so big that the entire eye will pull through.
-Put the eye loop on the needle and pull the eye through on the thread.
-Check your eye hole to make sure that it is big enough for the loop to fit through but not so big that the entire eye will pull through.
 The eye is dangling on the thread.
-Insert the needle back into the same hole and return the needle and thread back to behind the ear.
-Pull the eye so that the loop of the eye is in the hole. Pull tightly to be sure that the eye is firmly in the hole. -- - -Take a stitch behind the ear to anchor the thread and keep the eye from slipping out.
-Now repeat the same process for inserting the second eye. Knot off and cut the upholstery thread when, you are done.
The eye is dangling on the thread.
-Insert the needle back into the same hole and return the needle and thread back to behind the ear.
-Pull the eye so that the loop of the eye is in the hole. Pull tightly to be sure that the eye is firmly in the hole. -- - -Take a stitch behind the ear to anchor the thread and keep the eye from slipping out.
-Now repeat the same process for inserting the second eye. Knot off and cut the upholstery thread when, you are done.
 eyebrows 1
-Hey Connie, what about the embroidery thread hanging out of my neck?” That’s a good question. How about adding some eyebrows?
-Place 2 pins over each eye to mark placement of brows.
-You choose the brow size. Be sure that they are both the same length.
eyebrows 1
-Hey Connie, what about the embroidery thread hanging out of my neck?” That’s a good question. How about adding some eyebrows?
-Place 2 pins over each eye to mark placement of brows.
-You choose the brow size. Be sure that they are both the same length.
 -Put a needle on the embroidery thread is still coming out of the neck.
-Insert your needle up through the head and make one stitch for the first brow. Go back into the head to the second eye. -Take a stitch for the second brow. Remove the pins. Come down to the neck. Knot and cut your thread
-Put a needle on the embroidery thread is still coming out of the neck.
-Insert your needle up through the head and make one stitch for the first brow. Go back into the head to the second eye. -Take a stitch for the second brow. Remove the pins. Come down to the neck. Knot and cut your thread
 Done! How about a bow?

3 comments:
Fabulous Connie!! I will check to see if I can share it on the OFG Team blog a bit later and will let you know.
Such a sweet face! Love this!
Thanks for sharing,
Barb
Thank you for the lovely comment, Barb. Connie
Wow, I've been doing it all wrong. I make the indents by pulling the thread in the front, not behind the ears. I've never done eyebrows, they are adorable. The bear has so much more personality.
Thank you sooo much!!
Hugs,
Susan
Post a Comment